Buildroot with Raspberry Pi - What, where and how to start

Recently, I started to dig into the topic of Linux kernel, especially from the embedded point of view. I got a chance to explore the operating system, its configuration and build process at Nokia, where I currently work. I decided to shift this exploration to a different kind of hardware. Since I've got two Raspberry Pi at home, I decided to make a mini project, where I would prepare the operating system myself.
At first, I thought about using Yocto, but since I don't need the out-of-the box package management provided by this build system, I ended up using Buildroot. What is more, it turned out that Buildroot prepares the image much faster than Yocto. The first one builds it in less than an hour, the second one uses more than 4 hours.
In the following sections, I will describe the steps needed to prepare a minimal image, which can be booted on the RPi. I will also show, how to access the freshly booted system without any network connection or external LCD.
I will not go into Buildroot details yet. The goal is to get the system up fast.
At the moment of writing this post, the latest stable buildroot version is 2016.02.
Getting buildroot
It's easy as a pie:
$ wget https://buildroot.org/downloads/buildroot-2016.02.tar.bz2
$ tar xvjf buildroot-2016.02.tar.bz2
$ cd buildroot-2016.02
Building
Buildroot is now ready for initial configuration. There are few commands that can help:
$ make help
$ make list-defconfigs
The first one will show all of the make commands that are available. After executing the second one, two interesting configurations can be found:
raspberrypi2_defconfig - Build for raspberrypi2
raspberrypi_defconfig - Build for raspberrypi
Since I'm using Raspberry Pi B, the choice is obvious:
$ make raspberrypi_defconfig
Which does not last too long:
real	0m1.252s
user	0m0.868s
sys	0m0.124s
Now, with a little bit of patience:
$ make all
Which takes (on a i5-3320M):
real	42m22.210s
user	101m33.384s
sys	7m20.732s
NOTE!
The first time I ran make all, there was a problem with downloading the mpfr library. www.mpfr.org was unavailable, causing wget to hang and retry connection. The solution was to switch source address in package/mpfr/mpfr.mk
#MPFR_SITE = http://www.mpfr.org/mpfr-$(MPFR_VERSION)
MPFR_SITE = https://ftp.gnu.org/gnu/mpfr
Buildroot places the output files in:
output/images
And the most interesting at the moment is the sdcard.img
$ ls -al output/images/sdcard.img -h
-rw-r--r-- 1 tekieli tekieli 84M 04-03 18:11 output/images/sdcard.img
The default image is only 84 megabytes, which is much less than a Raspbian. The image can be copied straight to the SD Card:
$ dd if=sdcard.img of=/dev/mmcblk0
Booting up
Unfortunately, placing the SD card in the RPi is not enough. Since the default configuration does not set up any network, it is good to have some kind of control over the system. Serial console is the perfect answer.
Here is my setup:
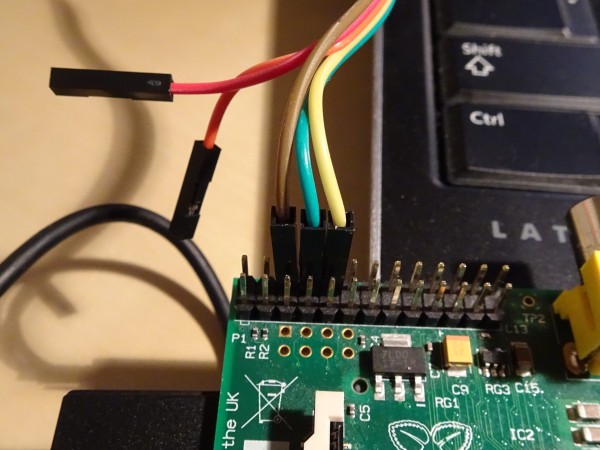
| RPi | Wire | Serial adapter |
|---|---|---|
| GND | BROWN | GND |
| TX | GREEN | RX |
| RX | YELLOW | TX |
To access serial connection:
$ minicom -b 115200 -D /dev/ttyUSB0
After connecting the serial adapter and powering up Pi, minicom shows:
"Uncompressing Linux... done, booting the kernel."
Great! Serial connections works, but nothing more, no logs, no login prompt. It turns out that the default arguments supplied to the kernel are:
root=/dev/mmcblk0p2 rootwait
Serial output needs to be enabled. To do this, cmdline.txt file needs to be modified. It is located on the first partition of the SD card.
console=ttyAMA0,115200 root=/dev/mmcblk0p2 rootwait
This will enable the log output during kernel startup. To enable the login prompt, so that we are able access the newly built system, a minor change needs to be done in the Buildroot configuration. To access the configuration, in the Buildroot top directory run:
$ make nconfig
Go to "System configuration" -> "Run a getty after boot" and set the "TTY port" to ttyAMA0, "Baudrate" to 115200 and "TERM environment variable" to vt100.
After exiting, run make all to rebuild the change. This time the build execution should take seconds, as all of the results of previous run are reused.
The change can be checked in:
$ cat output/target/etc/inittab
...
ttyAMA0::respawn:/sbin/getty -L  ttyAMA0 115200 vt100 # GENERIC_SERIAL
...
After copying the new image to the SD card, login through serial console will be enabled:
Welcome to Buildroot
buildroot login:
Default login is root and password is not set.
# ls -al /
total 31
drwxr-xr-x   18 root     root          1024 Apr  3  2016 .
drwxr-xr-x   18 root     root          1024 Apr  3  2016 ..
drwxr-xr-x    2 root     root          3072 Apr  3  2016 bin
drwxr-xr-x    7 root     root          2580 Jan  1 00:00 dev
drwxr-xr-x    5 root     root          1024 Jan  1 00:00 etc
drwxr-xr-x    4 root     root          1024 Apr  3  2016 lib
lrwxrwxrwx    1 root     root             3 Apr  3  2016 lib32 -> lib
lrwxrwxrwx    1 root     root            11 Apr  3  2016 linuxrc -> bin/busybox
drwx------    2 root     root         16384 Apr  3  2016 lost+found
drwxr-xr-x    2 root     root          1024 Mar  1  2016 media
drwxr-xr-x    3 root     root          1024 Jan  1  1970 mnt
drwxr-xr-x    2 root     root          1024 Mar  1  2016 opt
dr-xr-xr-x   52 root     root             0 Jan  1 00:00 proc
drwx------    2 root     root          1024 Jan  1 00:00 root
drwxr-xr-x    3 root     root           140 Jan  1 00:00 run
drwxr-xr-x    2 root     root          1024 Apr  3  2016 sbin
dr-xr-xr-x   11 root     root             0 Jan  1 00:00 sys
drwxrwxrwt    2 root     root            60 Jan  1 00:00 tmp
drwxr-xr-x    6 root     root          1024 Apr  3  2016 usr
drwxr-xr-x    4 root     root          1024 Apr  3  2016 var
The system is now functional and ready for further customizations.